Making Repositories#
Learning Objectives#
Understand what a repository is in the context of version control systems
Learn the steps to create a remote repository on GitHub
Understand how to clone a remote repository to create a local version
Learn to create a new repository on a local computer from scratch
Recognize the structure of a local repository and best practices for managing it
What is a repository?#
In version control systems, such as Git, a repository is a space where your files live together with information about the version history of the files. In Git, this repository can live either locally (i.e. on your own computer) or remotely (somewhere other than your own computer). Remote repositories may be hosted on another machine, such as an institutional server, or on a cloud-based service, such as GitHub.
It is perfectly possible to create a Git repository on your own computer and have it exist in isolation. This allows you to keep a version history of files that you develop within the repository, but doesn’t provide a way to easily share this developmental history with others, or collaborate with them on code. The most common way that a person uses Git is instead to have a local repository that is linked to a remote repository. A typical example is where there is a remote repository on GitHub and you have a local version of the repository on your own computer. You keep the remote repository up-to-date by ‘pushing’ updates made on your local repository to the remote repository (we will look more at this later in the course). Someone else can then obtain a copy of your work by getting it from the remote repository.
We’ll see later in this course that a whole team of developers can contribute to a shared codebase by working with a common remote repository. In this set up, the remote repository acts as a central location for receiving updates from all team members, and these updates are propagated throughout the team by the individual members keeping their own local versions of the repository up-to-date with the remote one.
Creating repositories#
So how do you create repositories? We’ll look at two different ways to do this:
Creating a remote repository on GitHub.
‘Cloning’ a remote repository to create a local version on your own computer.
Case 2 is probably the most immediately helpful for Git novices, allowing them to get working with a repository that has already been set up by somebody else. Case 1 is, of course, helpful if you find yourself in the situation of needing to create a remote repository on GitHub… And it gives us something to demonstrate case 2 with!
We’ll also briefly cover how you can create a new repository on a computer without using a platform like GitHub. You’re less likely to come across this in practice, but we cover it for completeness.
Creating a remote repository on GitHub#
Below we outline simplified steps for creating a new repository on your personal GitHub account, which will be adequate for this course. Full instructions for creating repositories on GitHub can be found at https://docs.github.com/en/repositories/creating-and-managing-repositories/creating-a-new-repository. In what follows, accept the default options on GitHub unless we specify otherwise.
Step 1: Log into your GitHub account.
Step 2: Click on the ‘+’ drop-down menu in the top-right corner and select New repository.
Step 3: Enter the name for your repository.
This should be short and meaningful. Only use characters that you would use for naming folders on your own computer.
Step 4: Choose whether to make your repository publicly visible or private. We suggest making any repositories you create for this course private, so that you can practice out of the gaze of the internet.
Public repositories can be viewed by anyone on the internet, even those who don’t have a GitHub account. Private repositories are only visible by you and people that you specifically invite.
Step 5: In the section Initialize this repository with:, select the Add a README file option. A readme file provides useful information to new users of the repository, explaining what the repository is for and generally helping them get started with using the code in it. This is not necessary, but it’s good practice to include one whenever you create a new repository.
Step 6: Click on Create repository to finish and create the repository.
Immediately after creating the repository you’ll be taken to the repository’s main page on GitHub. For now, the main thing to look at is the content under the Code tab in the top-left corner, which gives you a view of the contents of the repository. (There won’t be much in there to begin with, of course.)
In the future, you can return to the repository by going to your main
GitHub account page and finding it under the Repositories tab. Notice that
the URL for the repository has the format https://github.com/user-name/repo-name
where user-name is your GitHub username and repo-name is the name you gave
the repository.
Further options for GitHub repositories#
Let’s take a moment to mention a few extra things about creating repositories on GitHub. None of these points are essential for moving forward, but you’ll likely come into contact with them as you use GitHub more:
When creating the repository, there was the option to initialise the repository with some extra files:
A
.gitignorefile. This is a particular file that can be used to tell Git about files that it should not keep a version history for. We will see this later in the course.A licence file. If you intend to make your work publicly available, then it’s important to include a licence file which both allows others to use your work and specifies the terms for its use. You can read more about this important topic on GitHub and on the Software Sustainability Institute’s website.
If you belong to an Organisation on GitHub and have the correct permissions, then you will be able to create repositories under the organisation instead of your own user account. See GitHub’s overview on organisations for more information.
Cloning a remote repository#
We mentioned above that the most common way of using Git is to have a local repository that is linked to a remote repository. In Git parlance, the local repository is created by cloning the remote repository.
Any remote repository will have a URL which specifies its location — you can
recognise them in that they end with .git. You need this URL to clone the
remote repository.
Example: GitHub repositories#
The URL for a remote repository on GitHub can be found by going to the repository’s main webpage. Under the Code tab, there is a green drop-down button, also labelled Code. Click this and copy the HTTPS address listed under the Clone section — this is the URL for the remote repository. (Strictly speaking, this is the URL that uses the HTTPS protocol; other protocols, such as SSH, are available to use instead if you prefer. We’ll use HTTPS for this course because it doesn’t require extra set-up.)
To create a local ‘clone’ of the remote repository, navigate in the command-line to a folder where you’d like to put your repository. Then run
git clone <remote-repo-url>
This will create a new folder with the same name as the remote repository and download all the repository’s contents into it.
GitHub authentication#
If the remote repository is private, you may be prompted to enter yourGitHub username and a password. Use your Personal Access Token for the password, not your GitHub account password.
If you instead want to put the contents of the repository into a specific folder, then use the form
git clone <remote-repo-url> path/to/folder
Example#
Joe Bloggs created a remote repository on GitHub called test-repo and the remote repository’s URL is https://github.com/jbloggs9999/test-repo.git. On his Mac, he navigates to the folder ~/Documents/Repositories and runs
git clone https://github.com/jbloggs9999/test-repo.git
This creates a new folder called test-repo within his Repositories folder, which contains the local, cloned repository. If he instead had run
git clone https://github.com/jbloggs9999/test-repo.git my-test-repo-clone/
then this would have put the contents of the repository into the folder ~/Documents/Repositories/my-test-repo-clone.
Creating a new repository on your computer#
We can also create a new repository from scratch on our computer. Since there isn’t any existing remote repository to clone from, we use a different command:
git init path/to/new/repo
For example, running git init foobar will create a folder foobar in
our current working directory, which contains the new Git repository.
Using git init creates a repository that is contained on the host computer
only. This can be used if you just want to keep track of your work, with no
interest in sharing it with others or syncing it with a remote version. Other
than that, git init can also be used for manually setting up a repository
that serves as a remote repository. This might be done on a
departmental server so that the remote repository is contained on the server, for example.
We won’t say more on how to do this in this course, but if you are interested
then see the section on ‘bare’ repositories on
Atlassian Git Tutorials: Setting Up a Repository.
Renaming the default branch#
In the previous episode, we discussed changing the name of the default branch from master to something else, e.g. main. For Git versions 2.28 and later, the configuration can be set so that new repositories have this new name by default, see the Setting up Git and GitHub episode. If the version of Git you are using is earlier than 2.28, then this needs to be done for each repository individually. After creating the repository with git init, run the following command:
$ git checkout -b main
What does a local repository look like?#
We’ll conclude this episode with taking a peek into an example repository that has been
created locally, whether this be via cloning or using git init.
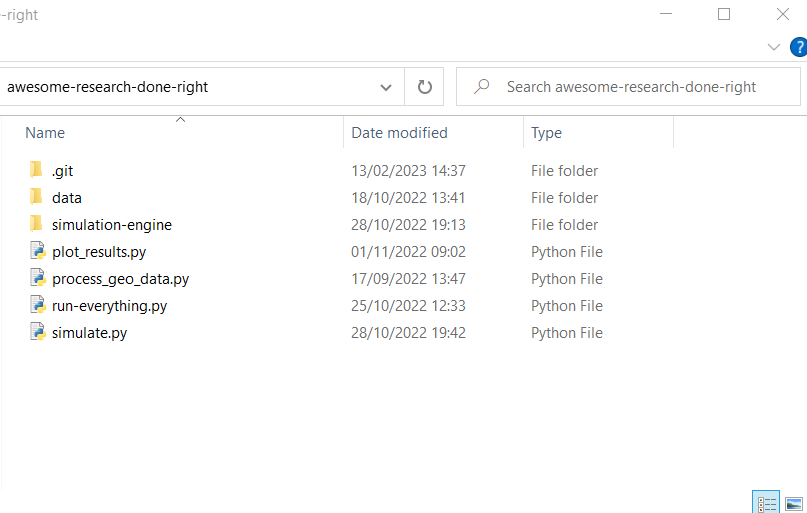
Let’s consider an example, looking at the more organised folder of work introduced in the episode Git vs GitHub. Below is a screenshot of the repository on a Windows machine; note that we’ve enabled the display of ‘hidden’ files and folders, i.e. those whose names begin with a period.
And here is the same repository displayed on a Linux operating system, using the
command line; note we are displaying hidden files using the -a option
in the ls command:
$ ls -a awesome-research-done-right/
.  ..  .git  data  plot_results.py  process_geo_data.py  run-everything.py  simulate.py  simulation-engine
It is common for people to refer to the top level folder of the repository as the
root folder; in the above example,
awesome-research-done-right is the root folder. (Note: this is distinct from the
‘root’ folder / on Unix systems that you might have heard of.) By
default, Git will keep track of the version history of all files located within the
root folder or subfolders thereof. Where exactly does Git keep all the
versioning information? Answer: it’s kept in the .git folder, which you may
have spotted in the example outputs above. This is a folder that Git creates
automatically when the repository is created.
Warning!#
As a general rule, don’t go modifying the files in the .git folder within a repository. Accidentally modifying a file / subfolder will likely mess up the version history of the repository. There are files in the .git folder that are suitable for direct modification, allowing users to customise their interaction with Git, but this comes under more advanced use that is beyond the scope of this course.
Our advice: don’t poke around the .git folder, unless you are a confident Git user and need to customise Git (even then, follow a reputable tutorial or guide the first time).