Recording Changes#
Learning objectives#
Understand the process of recording changes in a Git repository using the
git addandgit commitcommands.Learn to check the status of a Git repository using the
git statuscommandComprehend the concept of the modify-add-commit workflow for building a version history in Git
Practice creating and committing new files in a repository
Develop best practices for writing informative commit messages
Viewing the status of a repository#
So, we have a new repository, either a clone from a remote repository or a
brand new, empty one. It’s time to get to work adding content to it. But before
we do that, let’s cover one of the simplest, yet most useful, Git commands:
git status.
The git status command gives you information about the current state of work
when working with a Git repository. Let’s take a look at an example with our recently cloned
git-good-practice repository. We first need to make sure that we’re located
in the root folder of the repository. In the example below, this is contained
within the parent folder ~/repositories, so we first change directories with
cd and remind ourselves of the contents:
$ cd ~/repositories/git-good-practice
$ ls
README.md
Currently there’s just a single readme file. Recall that the git-good-practice
folder actually also contains the hidden folder .git, which we would have also
seen if we’d used ls -a instead of just plain old ls. Now we can check the
status of the repository:
$ git status
On branch main
Your branch is up to date with 'origin/main'.

nothing to commit, working tree clean
Let’s consider what the output means:
The first two lines refer to a branch called
main, and how it’s up-to-date with another branch calledorigin/main. For now, you can regard these lines as saying that our local version of the repository is in sync with the remote version. (This is not the whole story and is, at best, a partial truth. We’ll uncover more about what this really means later in the course when we learn about branches more generally.)The line
nothing to commit, working tree cleanis of more immediate interest. This is Git’s way of saying that it hasn’t identified any changes to the contents of the repository (‘working tree clean’), so there are no new changes that could be recorded in the repository’s history (‘nothing to commit’).Finally, note that
git statusonly gives us information about changes to the contents of the repository. It doesn’t spell out the whole contents of the repository likelswould. For example, we know that the repository contains the fileREADME.md, yet it doesn’t feature in the output ofgit statusbecause there aren’t any (new) changes to it.
For our purposes, you can think of the working tree as the contents of the repository, just like you’re used to thinking of files within a folder or subfolders. Git is able to detect changes to files in the working tree, including those that are in subfolders of the repository root folder (or sub-subfolders, etc.)
Run git status often#
We’re going to flag here that you should get into the habit of running git status often. It’s the primary way of seeing at a glance what state your working tree is in and how it differs (or not) with what was last recorded in the repository.
Adding and committing files#
Let’s make some changes to the repository. First, we’ll create a new Markdown
file called Git-cheatsheet.md, for us to record key Git commands as we go.
Running git status now shows us:
$ git status
On branch main
Your branch is up to date with 'origin/main'.

Untracked files:
  (use "git add <file>..." to include in what will be committed)
        Git-cheatsheet.md

nothing added to commit but untracked files present (use "git add" to track)
The ‘Untracked files:’ bit indicates that Git has spotted a new file which it
has no record of. Before going further, let’s add some content to the cheatsheet
about git status:
# Git Cheatsheet

*Note: run commands from within a Git repository*


## Checking the state of files (do this often!)

`git status` — Checks the state of the working tree in a Git repository.
Markdown syntax#
Hash symbols (
#) are used to denote the document title and headings. One hash#denotes the document title, two hashes##indicates a section heading, three hashes###indicates a sub-heading, etc.Wrapping text with asterisks (
*) will emphasise text i.e. set it in italics. You can also wrap the text in underscores (_) e.g.*This* is in italics, so is _this_.Wrapping text in backticks (
`) is used to display code. It won’t be formatted like regular text. Compare:Wrapped in backticks:
`foo _bar_`renders asfoo _bar_As regular text:
foo _bar_renders as foo bar
Extra spaces and tabs are just treated as a single space. Paragraphs must have a blank line between them to be rendered on different lines.
After adding the above text to Git-cheatsheet.md file and saving our changes,
we now tell Git to start tracking changes to this file by using the add
command:
$ git add Git-cheatsheet.md
Let’s see what git status now tells us:
$ git status
On branch main
Your branch is up to date with 'origin/main'.

Changes to be committed:
  (use "git restore --staged <file>..." to unstage)
        new file:   Git-cheatsheet.md
The difference between this status and the status before we did git add on our
cheatsheet is the ‘Changes to be committed:’ bit. Git has now recognised that
it has a new file, called Git-cheatsheet.md, to keep track of. In Git parlance,
Git-cheatsheet.md has become a tracked file. But it hasn’t
yet stored the new version of the file as part of its history. To do that, we
need to run another Git command, called commit:
$ git commit
Upon entering this command, the text editor we configured for Git earlier springs into life, opening up a file with some pre-defined text and leaving space at the top for us to write in. (The lines preceded by hashes are comments that are ignored by Git.)
# Please enter the commit message for your changes. Lines starting
# with '#' will be ignored, and an empty message aborts the commit.
#
# On branch main
# Your branch is up to date with 'origin/main'.
#
# Changes to be committed:
#       new file:   Git-cheatsheet.md
#
As you can see, this file is for writing a commit message. This is a message that tells people about changes that are being committed to the repository. It should briefly, but clearly, describe the main changes that have been made. We add our commit message at the top of the opened file:
Create a cheatsheet document

Start the document by adding an entry for Git's status command.

# Please enter the commit message for your changes. Lines starting
# with '#' will be ignored, and an empty message aborts the commit.
#
# On branch main
# Your branch is up to date with 'origin/main'.
#
# Changes to be committed:
#       new file:   Git-cheatsheet.md
#
Once we’ve written our message, we save the document (don’t change the file
name!) and close it. The git commit command finishes and we get a little
summary message about what was just committed (note the first line of our
commit message is included):
$ git commit
[main 17912ce] Create a cheatsheet document
 1 file changed, 8 insertions(+)
 create mode 100644 Git-cheatsheet.md
When we run git commit,
Git takes everything we have told it to save by using git add
and stores a copy permanently inside the special .git directory.
This permanent copy is called a commit (or revision).
Best practice: commit messages#
Good commit messages start with a brief (usually < 50 characters) statement about the changes made in the commit. Generally, the message should complete the sentence “If applied, this commit will [commit message here]”. If you want to go into more detail, add a blank line between the summary line and your additional notes. Use this additional space to explain why you made changes and/or what their impact will be. Avoid uninformative messages such as “small tweaks” or “updates” — write what will be useful for others to read (which includes yourself in one year’s time).
If we now run git status again, we get the following:
$ git status
On branch main
Your branch is ahead of 'origin/main' by 1 commit.
  (use "git push" to publish your local commits)

nothing to commit, working tree clean
Git is now telling us that:
There are no further changes in the repository to record (‘nothing to commit, working tree clean’).
The new version of the repository has been recorded in a commit (“Your branch is ahead of ‘origin/main’ by 1 commit.”) The “ahead of ‘origin/main’” bit indicates that our local repository now has new snapshots that aren’t recorded in the remote repository. We’ll discuss this in a later episode, so just focus on the “1 commit” bit for now.
Modify-add-commit#
The example above alludes to the idea that developing files in Git involves iteratively going round a three step cycle:
Modify the files in your repository.
Add the changes you want to record.
Commit these changes to the repository’s history.
This modify-add-commit cycle is the bread-and-butter of using Git and it will very soon become second nature to you.
Before continuing, we want to mention another piece of terminology relating to
the add command. In Git parlance, applying git add to a file
stages the changes in that file, ready for committing. To allow for this,
Git has a special staging area (also called the index) where it keeps
track of things that should go into the next commit. It might help to remember
these terms by thinking of git add as ‘setting the stage’ for the next commit.
Best practice: commit little and often#
A commit is much easier to digest if it contains few changes. In fact, you should aim for each commit to capture one conceptual change to your work that can stand alone. This will make the history of your files’ development much easier to follow. A good rule of thumb: a commit should capture a change that you can describe in about 50 characters or fewer, potentially with extra explanation in the commit message if needed. Examples (with commit message):
Adding a new function to read in some sequencing data (’Add a function to read in sequencing data’).
Updating a configuration file to include the setting required for a particular experiment (’Change settings for experiment A simulation’ — the rest of the commit message may then give more detail on what these settings are).
Giving a variable a better name, which may be done across multiple files in the same commit (’Rename input variable to a more descriptive name’).
Adding this box about best practice for commit (’Add content about best practice for commits’). This is something you gain a feel for as you use Git more and study other developers’ work.
Selective staging#
Let’s make some more changes to our example repository, in a way that demonstrates the flexibility afforded by separating out the ‘add’ and ‘commit’ steps.
We’ll first modify Git-cheatsheet to include a note about how to use
git add for staging changes to files.
Note that, although we’ve only seen an example of adding changes to a single file, we
can actually add changes to multiple files by listing them out when running
git add, like this:
git add path/to/file1 path/to/file2 path/to/file3 ...
So we add the following lines to Git-cheatsheet.md:
## Adding / committing changes

`git add <files>` — Stages changes in the `<files>`, ready for committing.
However, we’ve also seen some tips on good practice about commits and commit
messages. So let’s create a new file, called Commit-good-practice.md and record
what we learnt about commit messages:
# Best practice when committing

## Commit messages

[Chris Beams: How to Write a Git Commit Message](https://chris.beams.io/posts/git-commit/)
start with a brief (usually < 50 characters) summary statement about the
changes made in the commit, with more explanation given in a new paragraph if
required. Generally, the summary should complete the sentence "If applied, this
commit will [_commit message here_]".

Avoid uninformative messages such as "small tweaks" or "updates" — write what
will be useful for others to read.
Markdown syntax#
Hyperlinks to external URLs are included by putting the text of the hyperlink in square brackets, immediately followed by the URL of the link in parentheses (with no space between the square brackets and parentheses). To just include a URL as its own hyperlink, just place it between angle brackets. Examples:
[Chris Beams: How to Write a Git Commit Message](https://chris.beams.io/posts/git-commit/)renders as the hyperlinked text Chris Beams: How to Write a Git Commit Message.<https://chris.beams.io/posts/git-commit/>renders as https://chris.beams.io/posts/git-commit/.
Let’s now check the state of the working tree:
$ git status
On branch main
Your branch is ahead of 'origin/main' by 1 commit.
  (use "git push" to publish your local commits)

Changes not staged for commit:
  (use "git add <file>..." to update what will be committed)
  (use "git restore <file>..." to discard changes in working directory)
        modified:   Git-cheatsheet.md

Untracked files:
  (use "git add <file>..." to include in what will be committed)
        Commit-good-practice.md

no changes added to commit (use "git add" and/or "git commit -a")
Git has noticed that:
The
Git-cheatsheet.mdfile has been modified, but it’s not yet been ‘staged’ for committing i.e. it’s not been added to the set of changes to include in the next commit. (Note the output under the section ‘Changes not staged for commit:’.)There is a new file
Commit-good-practice.md, which is currently not being tracked because we haven’t rungit addon it.
At this point, we could run git add Git-cheatsheet.md Commit-good-practice.md
to add both of these files, ready to commit with git commit. However, the
changes made to Git-cheatsheet.md are about using git add, whereas
the content of the new file Commit-best-practice.md is all about commits. So
it would instead be better to separate these changes out:
first commit the material about git add in the cheatsheet, then commit the
material about best practice with commit messages. Come to think of it,
we could extend the cheatsheet with a note about git commit along the way: this
would be a natural accompaniment to the Commit-good-practice.md file.
First thing’s first: we commit only the cheatsheet with it’s material about
using git add. We apply git add to Git-cheatsheet.md, then check the
status of the repository:
$ git add Git-cheatsheet.md
$ git status
On branch main
Your branch is ahead of 'origin/main' by 1 commit.
  (use "git push" to publish your local commits)

Changes to be committed:
  (use "git restore --staged <file>..." to unstage)
        modified:   Git-cheatsheet.md

Untracked files:
  (use "git add <file>..." to include in what will be committed)
        Commit-good-practice.md
Commit-good-practice.md is still not being tracked, but now the modifications
made to Git-cheatsheet.md have been staged, ready to be committed (as indicated
by the ‘Changes to be committed:’ part of the output).
Next we’ll commit the change to Git-cheatsheet.md, using the message
“Add entry about staging files with ‘git add’”. To speed things up a bit, we can
use the optional argument --message (equivalently, -m) to record use this
commit message without opening up a text editor, like so:
$ git commit -m "Add entry about staging files with 'git add'"
[main ad56194] Add entry about staging files with 'git add'
 1 file changed, 5 insertions(+)
Having committed just the changes to Git-cheatsheet.md, we see that Git still
recognises it has an untracked file in Commit-good-practice.md:
$ git status
On branch main
Your branch is ahead of 'origin/main' by 2 commits.
  (use "git push" to publish your local commits)

Untracked files:
  (use "git add <file>..." to include in what will be committed)
        Commit-good-practice.md

nothing added to commit but untracked files present (use "git add" to track)
We now take the opportunity to add a cheatsheet entry about the commit
command (under the ‘Adding / committing changes’ section):
`git commit` — Commit changes to the repository that have been staged with
               `git add`.
We now again have two sets of changes that have yet to be staged, one to the
cheatsheet and the other to the, as yet, still untracked Commit-good-practice.md.
So, finally, we now bank these changes in a single commit; first we stage them
with git add:
$ git add Git-cheatsheet.md Commit-good-practice.md
$ git status
On branch main
Your branch is ahead of 'origin/main' by 2 commits.
  (use "git push" to publish your local commits)

Changes to be committed:
  (use "git restore --staged <file>..." to unstage)
        new file:   Commit-good-practice.md
        modified:   Git-cheatsheet.md
Having checked with git status that each file has indeed been staged, we
go ahead and perform the commit. The commit message we use is the following:
Add material on committing

This includes both an entry for 'git commit' in the cheatsheet
and also material on good practice for commit messages in a new
'good practice' document.
Since this is a longer message (in particular, featuring line breaks) we use
the default git commit to use a text editor:
$ git commit
[main 34c19f2] Add material on committing
 2 files changed, 15 insertions(+)
 create mode 100644 Commit-good-practice.md
If we wanted, we could now verify that we have no more changes outstanding by
another call to git status.
Review#
At this point, you are hopefully starting to get an appreciation for why there
are two separate steps required to record changes to files in a
repository. Git insists that we
identify which files we want to commit, via git add,
before actually committing anything. If you think of Git as taking snapshots of
changes over the life of a project,
git add specifies what will go in a snapshot (putting things in the staging
area), and git commit then actually takes the snapshot, making a permanent
record of it (as a commit). This allows us to commit our
changes in stages and be selective in what we capture, so that changes are
recorded in logical steps rather than in large batches.
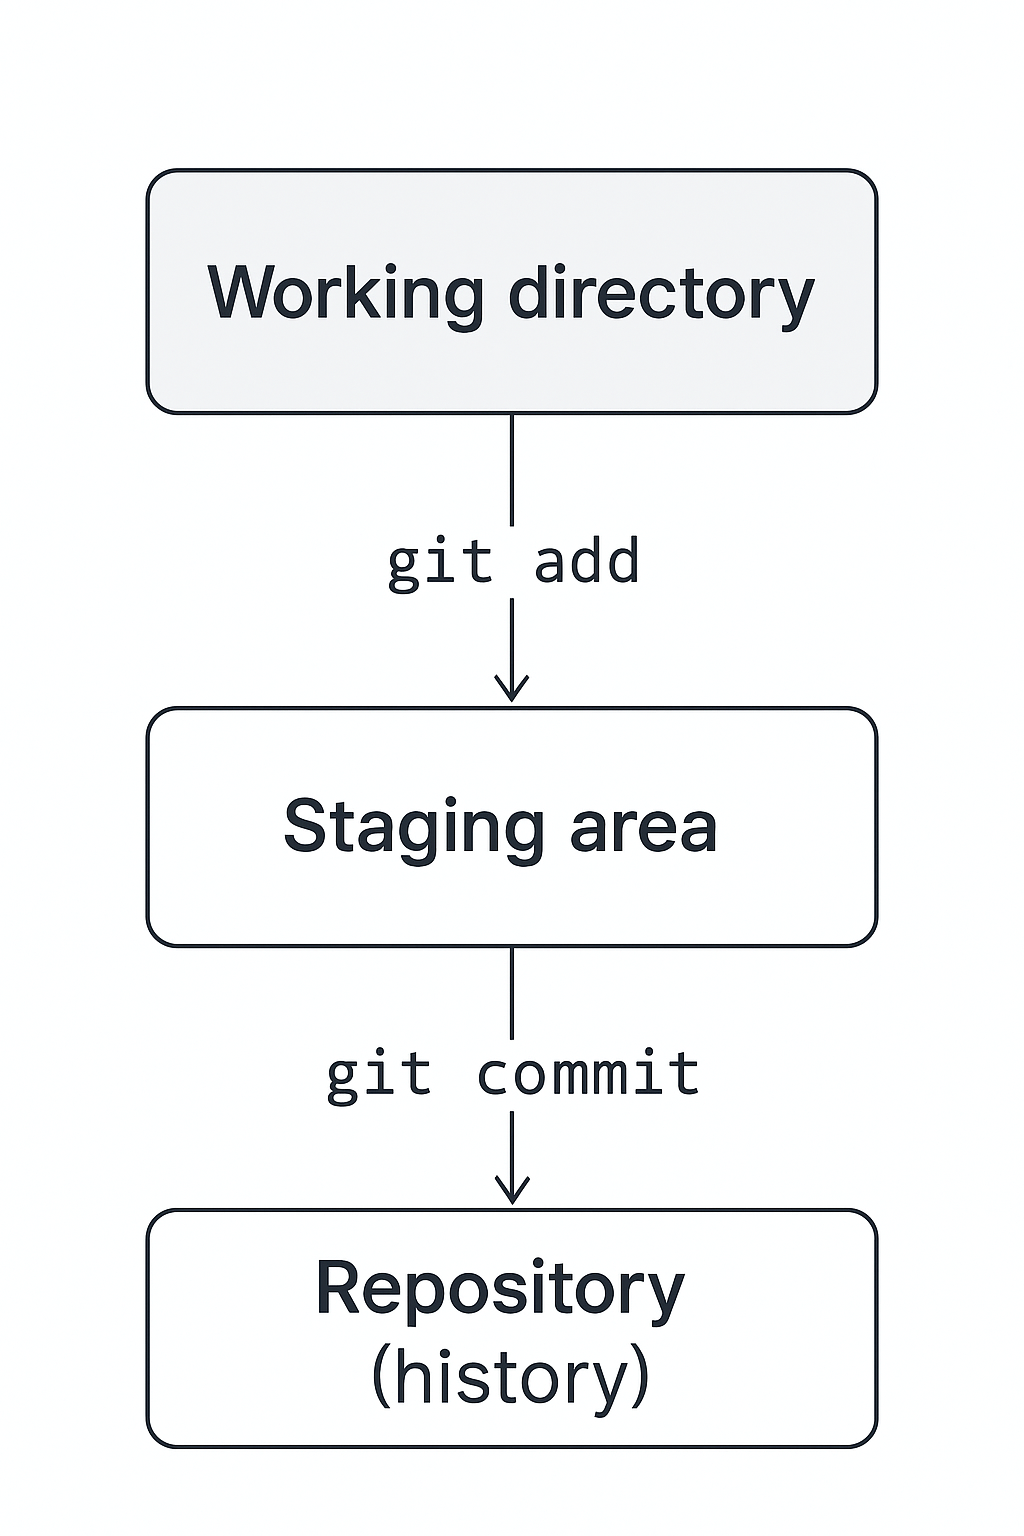
To summarise, there are three key ‘spaces’ to be aware of when working with files in Git:
The working tree — modifications that have not been staged with
git addThe staging area (a.k.a index) — contains changes that have been staged with
git addbut not yet committed withgit commit.The repository — a permanent record of changes (commits) that have been committed with
git commit.
git add moves changes from the working tree to the staging area, and git commit
‘seals the deal’ by moving changes from the staging area to the repository. This
process is captured in the following diagram.

The Git Commit Workflow image is © Software Carpentry and reused under CC-BY 4.0. It’s taken from Version Control with Git – Tracking Changes.
Exercise#
Using the modify-add-commit cycle, add more content to the cheatsheet and commit good practice documents, by adding an entry in the cheatsheet about the --message / -m option for git commit and including a section on ‘committing little and often’ in the Commit-good-practice.md document. Try practising ‘selective staging’ when you do this: modify both files to begin with, but then commit the changes one file at a time by using git add selectively.