Introduction to Python#
Course Description#
Python is one of the most popular general-purpose programming languages around. It is used in a huge range of applications, from building systems incorporating cutting-edge machine learning, such as in self-driving cars, to building web applications with hundreds of millions of users, as seen in Instagram. As researchers, we use Python for all manner of tasks, from data analysis, to automation, to prototyping software, to creating engaging visuals for websites and publications. Like you, we started our journey into Python learning the basics, building a strong foundation for achieving these more complex tasks. This introductory course will teach you these basics, and get you up to speed on your own programming journeys.
Course Objectives#
Understand and declare the basic data types in Python.
Understand the basic principles of control flow and for loops.
Describe what a function is and define one that takes user-specified parameters.
Perform simple data analysis/visualisation of a table of data.
Recognise concepts in other programming languages.
Pre-requisite Knowledge#
No pre-requisite knowledge needed. However, course attendees will need to follow our setup guide to install Python and JupyterLab, which we will use for the course.
Sign-up#
To check for upcoming course dates and to register, please visit the Workshop Schedule and Sign-up page.
Installation Guide#
All CfRR courses require attendees to use their own computer/laptop to follow workshop activities and take effective notes.
Introduction#
Note
We are currently reviewing our installation instructions for this course. The following instructions can be used for current editions of the course, but may change in the future.
The minimal requirements for this course are an up-to-date web browser (e.g. Chrome, Firefox, Edge, Safari). Participants can optionally run Python on their own machines through either Anaconda (Option 1 below) or Miniforge (Option 3 below).
We will use JupyterLab - a browser-based text editor - to edit code. This is provided through the various installation options below, so you do not need to do anything extra to get this. The course instructor will cover how to start JupyterLab and create Jupyter notebook (.ipynb) files in the sessions. For those who have installed Anaconda on their laptops (Option 1), we have included a guide to launching JupyterLab below in case you want to try this yourself.
Option 1: (Windows) University-managed Anaconda#
For those using a University-issued Windows laptop, we advise colleagues to install Anaconda via the University’s centrally managed software catalogue (Company Portal) where possible. Click on the Windows icon in the toolbar and search for ‘Company Portal’ to find this.
Option 2: Online JupyterLab#
If option 1 is not possible or convenient for you, then we suggest you use an online version of JupyterLab. All that is required is a web browser and internet connection to use this. Visit https://jupyter.org/try and click on the card the says JupyterLab. This provides all the functionality we will need for this course and you can download the files you create after each session for later use.
Launching JupyterLab from Anaconda#
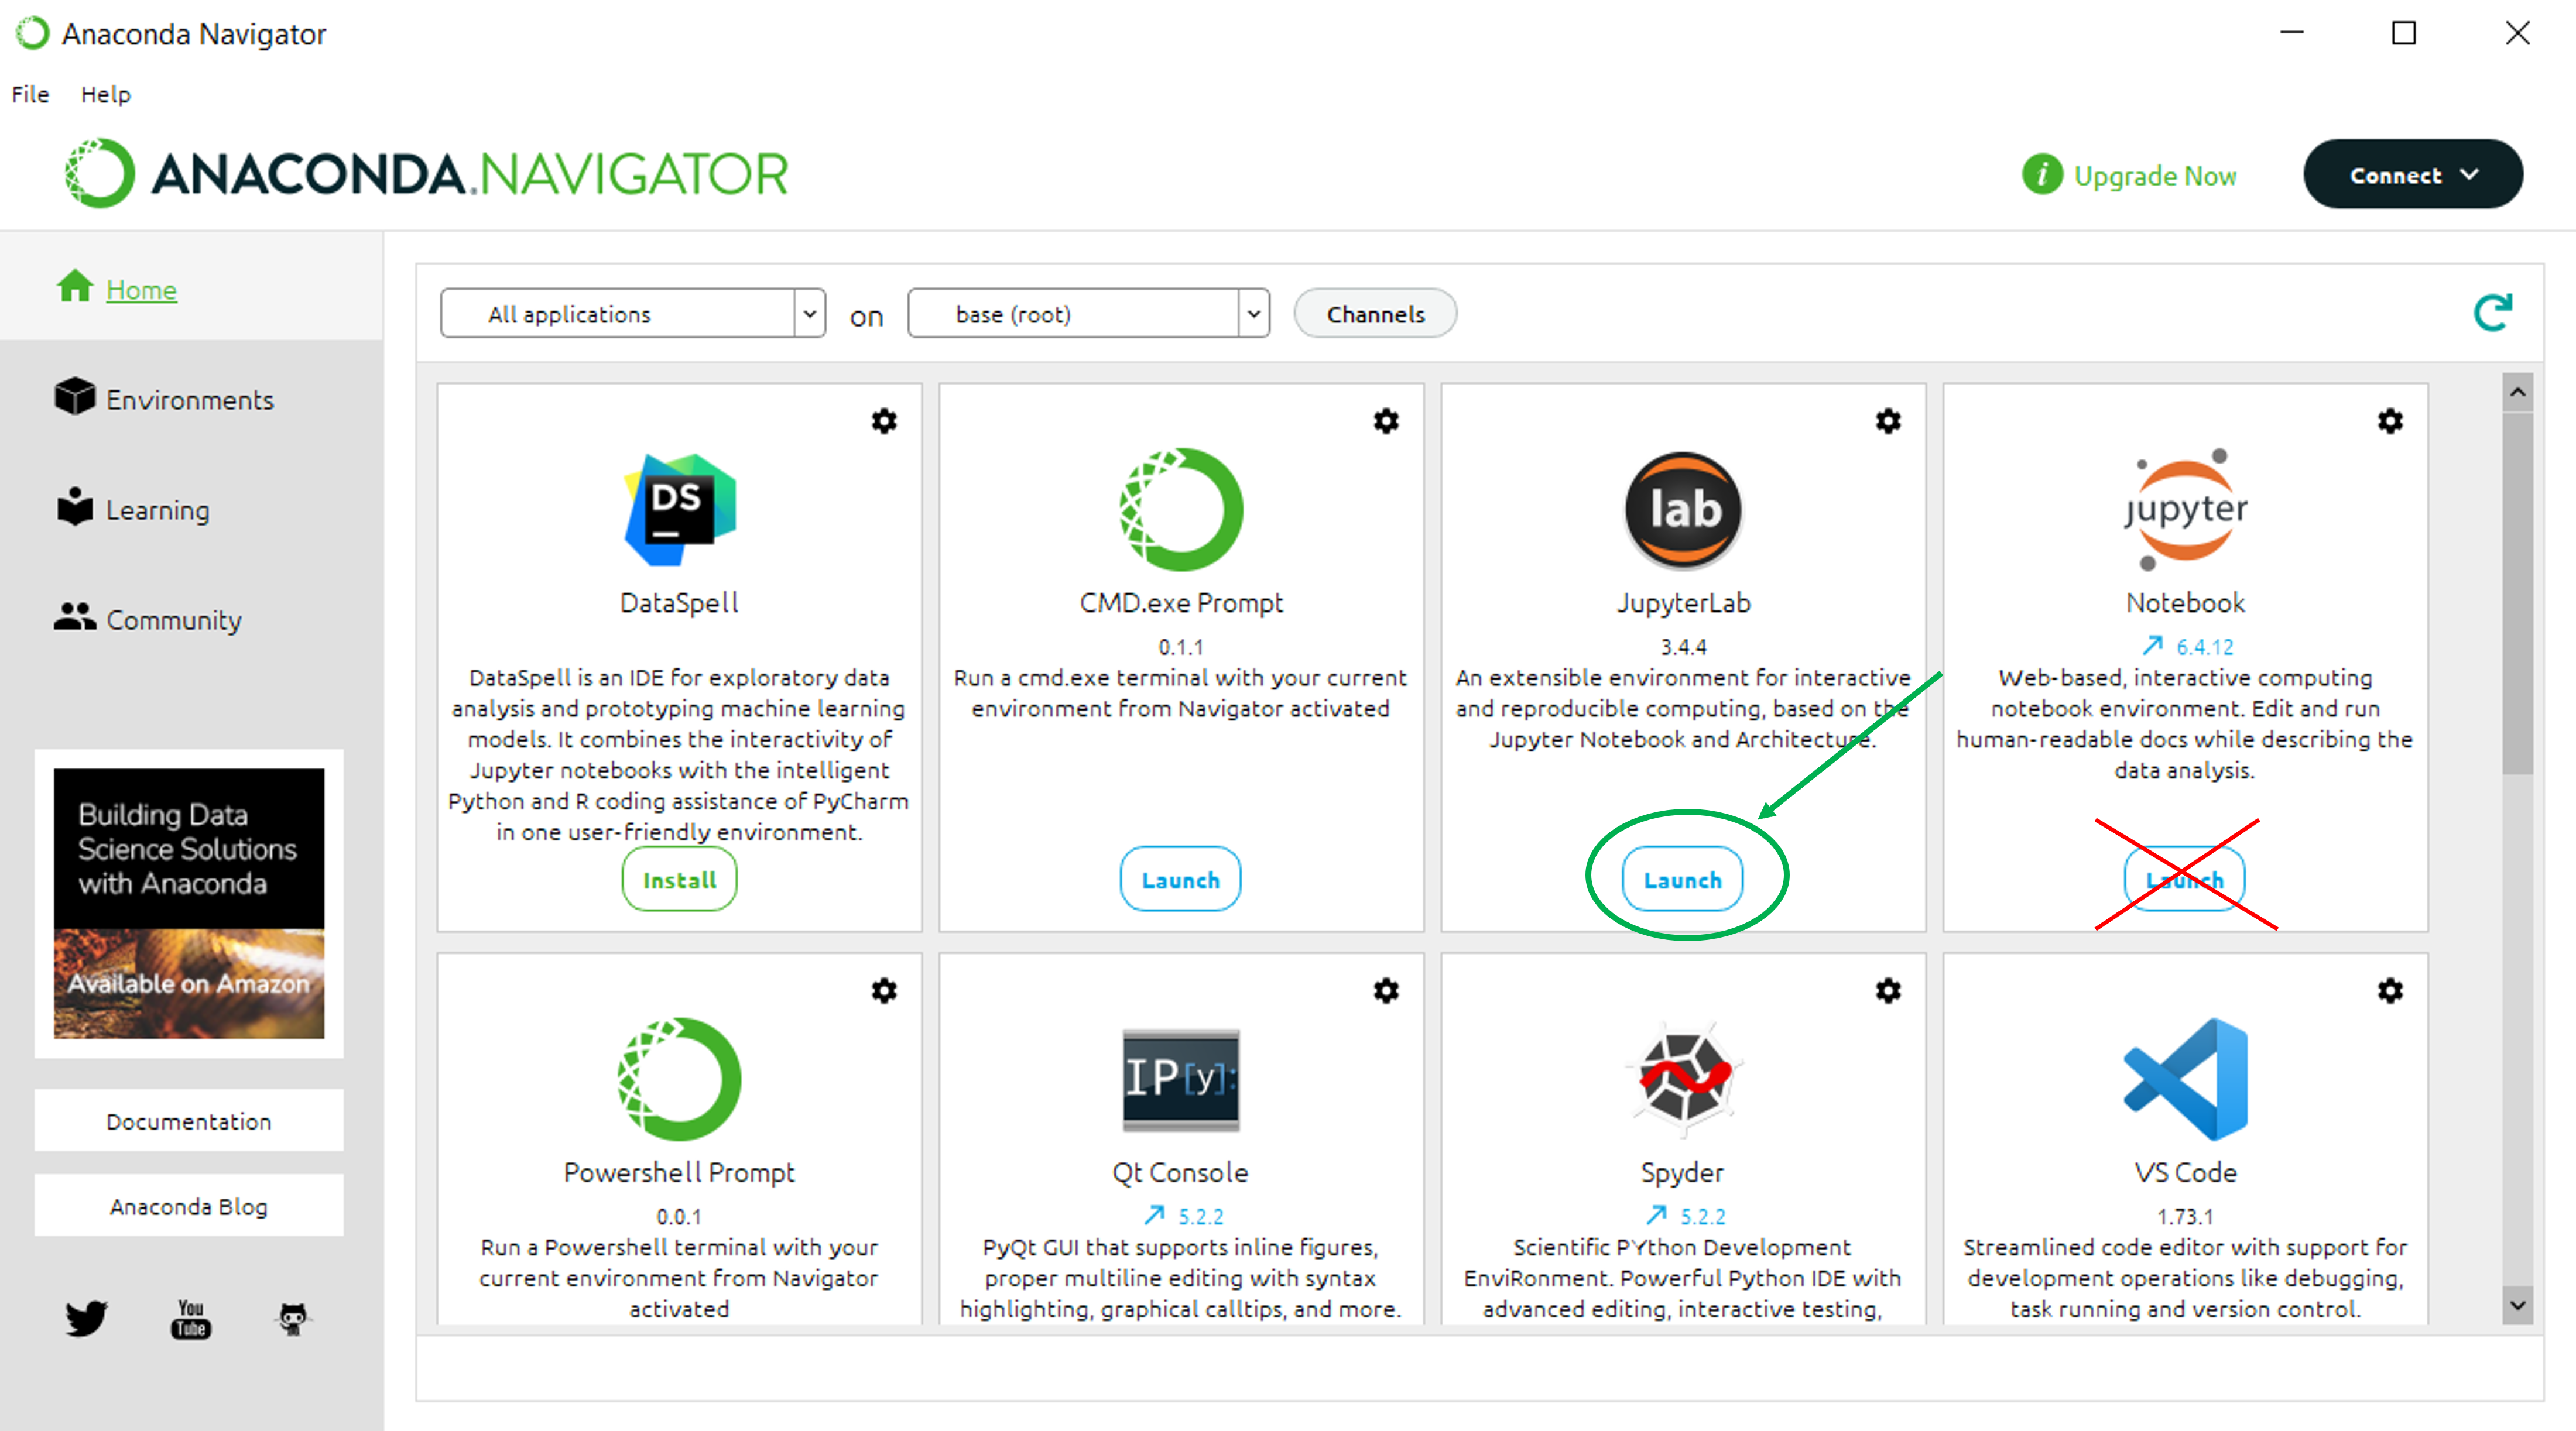
To launch JupyterLab, we first need to start up Anaconda Navigator. This can be done by searching for Anaconda Navigator in your system search bar, and clicking on the green, circular icon.
Once this has opened, click the JupyterLab launch button, as below. Please note that this is different from selecting “Notebook”.
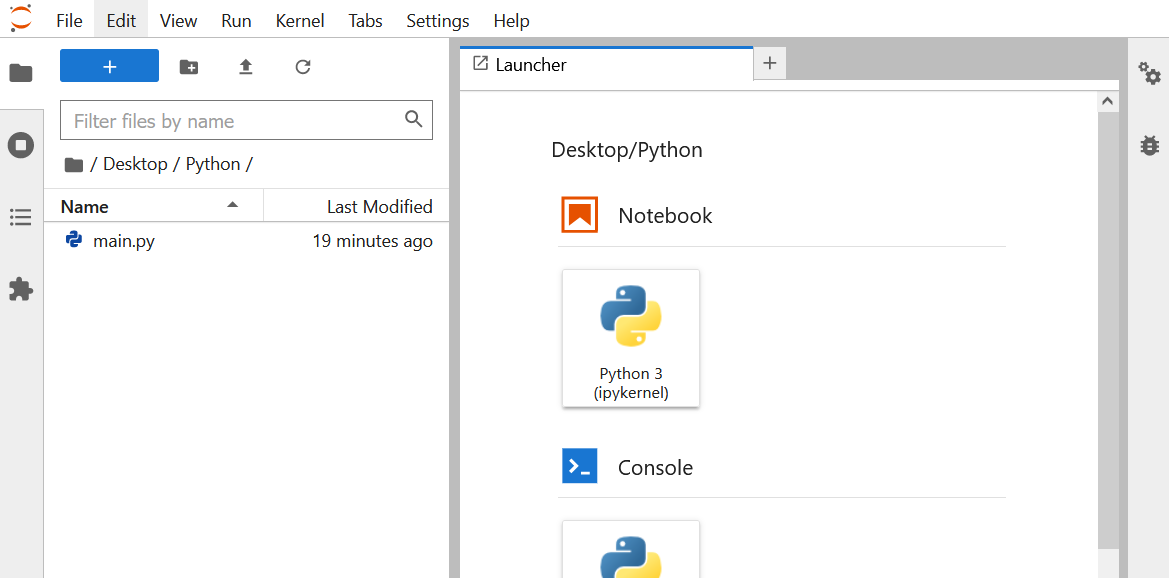
This should launch a web browser and open a tab for JupyterLab. The title of the tab will be JupyterLab. It will look something like the following image:
Other ways to launch JupyterLab#
If you installed Anaconda, you can also launch JupyterLab from the command line. If you’re on Windows, search for the application Anaconda Prompt and open it and type the following. On macOS or Linux, open a terminal window, and type the same command.
jupyter lab
To quit JupyterLab, hit Ctrl, C (you may need to do this a couple of times).
You can also see that you have Python installed using the same terminal type: from Anaconda Prompt (Windows) or a terminal window (Mac / Linux) type
python --version
You should see something similar to Python 3....
FAQ#
My browser isn’t showing anything and I cannot change browser!
From StackOverflow the basic answer is to create a config file and specify the browser. A config file can be created with
Jupyter notebook --generate-config
Then the
c.NotebookApp.browserandc.ServerApp.browseroptions can be set to the appropriate browser.
What is the difference between JupyterLab and a Jupyter Notebook?
JupyterLab is an editor (or integrated development environment, IDE) which can be used to create and edit notebooks and scripts.
A notebook is a particular format of script that allows code and text blocks to be interwoven. The code blocks can be executed in line to show their answers. This is a helpful format for explaining, demonstrating and exploring methods, and commonly used in research & teaching environments.
Self Study Material Link#
The self-study material for this course is available on the Self-study notes: Introduction to Python page.
Acknowledgements#
This course was adapted from the Software Carpentries Programming with Python. It has been developed by the University of Exeter Research Software Engineering Group and a team of generous volunteers who are enthusiastic about sharing their skills with the wider research community.
Its provision is dependent on the time of these volunteers. If you have benefited in any way from this course and want to support its long term sustainability then please take the time to complete our feedback survey, recommend it to your colleagues, and enthuse about it to your senior leadership team!
Developers#
The contributors to this course include:
Michael Saunby
Simon Kirby
Duncan McDougall
Eilis Hannon
Course Delivery Content#
There is currently no additional content that is used outside of the self-study notes to deliver this course.
License Info#
Instructional Material
The instructional material in this course is copyright © 2024 University of Exeter and is made available under the Creative Commons Attribution 4.0 International licence (https://creativecommons.org/licenses/by/4.0/). Instructional material consists of material that is contained within the “individual_modules/introduction_to_python” directory, and images folders in this directory, with the exception of code snippets and example programs found in files within these folders. Such code snippets and example programs are considered software for the purposes of this licence.
Software
Except where otherwise noted, software provided in this repository is made available under the MIT licence (https://opensource.org/licenses/MIT).
Copyright © 2024 University of Exeter
Permission is hereby granted, free of charge, to any person obtaining a copy of this software and associated documentation files (the “Software”), to deal in the Software without restriction, including without limitation the rights to use, copy, modify, merge, publish, distribute, sublicense, and/or sell copies of the Software, and to permit persons to whom the Software is furnished to do so, subject to the following conditions:
The above copyright notice and this permission notice shall be included in all copies or substantial portions of the Software.
THE SOFTWARE IS PROVIDED “AS IS”, WITHOUT WARRANTY OF ANY KIND, EXPRESS OR IMPLIED, INCLUDING BUT NOT LIMITED TO THE WARRANTIES OF MERCHANTABILITY, FITNESS FOR A PARTICULAR PURPOSE AND NONINFRINGEMENT. IN NO EVENT SHALL THE AUTHORS OR COPYRIGHT HOLDERS BE LIABLE FOR ANY CLAIM, DAMAGES OR OTHER LIABILITY, WHETHER IN AN ACTION OF CONTRACT, TORT OR OTHERWISE, ARISING FROM, OUT OF OR IN CONNECTION WITH THE SOFTWARE OR THE USE OR OTHER DEALINGS IN THE SOFTWARE.
The software in this repository is adapted from software that is covered by the following copyright and permission notice:
Copyright © 2024 Software Carpentry

Permission is hereby granted, free of charge, to any person obtaining
a copy of this software and associated documentation files (the
"Software"), to deal in the Software without restriction, including
without limitation the rights to use, copy, modify, merge, publish,
distribute, sublicense, and/or sell copies of the Software, and to
permit persons to whom the Software is furnished to do so, subject to
the following conditions:

The above copyright notice and this permission notice shall be
included in all copies or substantial portions of the Software.

THE SOFTWARE IS PROVIDED "AS IS", WITHOUT WARRANTY OF ANY KIND,
EXPRESS OR IMPLIED, INCLUDING BUT NOT LIMITED TO THE WARRANTIES OF
MERCHANTABILITY, FITNESS FOR A PARTICULAR PURPOSE AND
NONINFRINGEMENT. IN NO EVENT SHALL THE AUTHORS OR COPYRIGHT HOLDERS BE
LIABLE FOR ANY CLAIM, DAMAGES OR OTHER LIABILITY, WHETHER IN AN ACTION
OF CONTRACT, TORT OR OTHERWISE, ARISING FROM, OUT OF OR IN CONNECTION
WITH THE SOFTWARE OR THE USE OR OTHER DEALINGS IN THE SOFTWARE.