Getting Started with ISCA#
Learning Objectives#
Connect to the ISCA HPC system using SSH
Verify the installation of the SSH application on various operating systems
Create an SSH config file for easier access via the command line
Create and use an identity key for password-less login
Copy files using secure copy (
scp)Use graphical interfaces like PuTTY for connecting to HPC systems
ISCA Compute Resources#
A cluster of standard CPU nodes (Linux) (256 GB)
Large memory (3 TB) nodes
Xeon Phi accelerator nodes and GPU (Tesla K80) compute nodes
Fair Usage#
Central HPC systems provide powerful resources, but they are shared among many users. Both compute and storage are shared:
Compute usage is managed by a scheduler.
Storage may be restricted via quotas.
A fair usage policy ensures everyone can access compute resources within a reasonable timeframe. Unlike your personal computer, you may need to wait for resources and act considerately toward other users.
Citing Use of ISCA#
Please use the following acknowledgement in research outputs:
The authors would like to acknowledge the use of the University of Exeter High-Performance Computing (HPC) facility in carrying out this work.
When submitting to Symplectic, please add ARC - ISCA as an Unclassified Label.
Connecting to ISCA#
Connections must be made from the university network or VPN. ISCA cannot be accessed directly from public Wi-Fi or external institutions.
SSH: Secure Shell#
SSH (Secure SHell) provides:
Authentication (you are who you say you are)
Encrypted connections (no one can read your data)
SSH uses a client-server model. Your laptop is the client; ISCA is the server.
Verifying SSH Installation#
To check if SSH is available on your system, run:
ssh
You should see output like:
usage: ssh [-46AaCfGgKkMNnqsTtVvXxYy] ...
If you don’t see this, inform the instructor — other options exist.
Logging In#
Once access has been granted, log in using:
ssh userid@login02.isca.ex.ac.uk
Replace userid with your university login (e.g., xy123).
First-Time Warning#
On your first connection, you may see:
The authenticity of host 'login02.isca.ex.ac.uk (144.173.114.132)' can’t be established.
ED25519 key fingerprint is SHA256:rPqlD8myIfJUQBINKPYCp47oIQm3sGVMUPSAWT26E/M.
Are you sure you want to continue connecting (yes/no/[fingerprint])?
Confirm the fingerprint is correct and type yes.
This warning should only appear once. If it appears again later, contact system support.
SSH Config File#
To simplify SSH access, create a config file:
touch ~/.ssh/config
chmod 600 ~/.ssh/config
Edit the file with:
# SSH configuration for ISCA
Host isca
  HostName login02.isca.ex.ac.uk
  User your_username
  ForwardAgent yes
  IdentityFile ~/.ssh/id_ed25519
Now you can log in with:
ssh isca
Creating a Cryptographic Key#
Rather than entering your password every time, you can use an SSH key pair.
Generate a new key:
ssh-keygen -f ~/.ssh/id_ed25519
Choose no passphrase for now (for simplicity). This creates:
id_ed25519– your private key (keep it secure)id_ed25519.pub– your public key (to be uploaded to ISCA)
Installing the Public Key on ISCA#
The .pub key must be added to the server’s ~/.ssh/authorized_keys. An administrator may do this, or you may copy it manually.
After setup, you can log in without a password:
ssh -i ~/.ssh/id_ed25519 isca
Or just:
ssh isca
(if configured in ~/.ssh/config)
Copying Files with scp#
Use scp (secure copy) to transfer files between your machine and ISCA:
scp <source> <destination>
Example#
Copy a file to ISCA:
scp hello.txt userid@login02.isca.ex.ac.uk:
Or if using a config alias:
scp hello.txt isca:
Use -r to copy directories recursively:
scp -r my_folder/ isca:~/workspace/
Graphical Interfaces: PuTTY#
If you prefer a graphical tool, PuTTY is a free SSH client for Windows. You can:
Save session profiles
Use SSH keys
Avoid retyping hostnames
When connecting for the first time, PuTTY will also show a security warning similar to the command line.
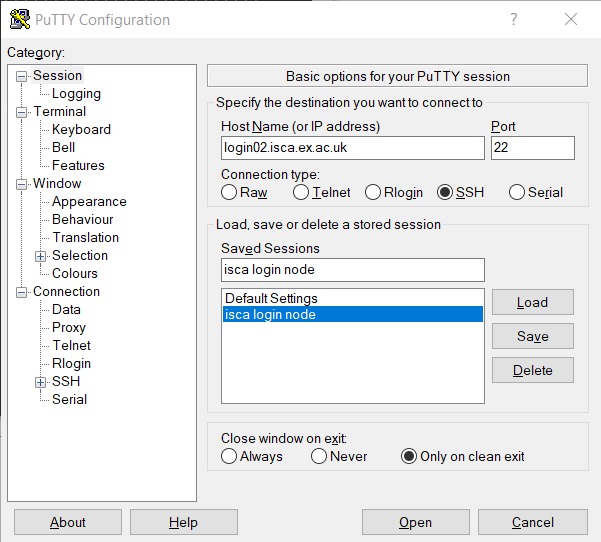
After opening the session, you’ll be prompted for your username and password.