R Environments#
Author: Amy Heather (GitHub: amyheather, ORCID: 0000-0002-6596-3479).
Reviewer: Tom Monks (GitHub: TomMonks, ORCID: 0000-0003-2631-4481).
Adapted from: DES RAP Book: Reproducible Discrete-Event Simulation in Python and R (Heather et al., 2025). This is a free online book which explains how to develop reproducible simulation studies as part of a reproducible analytical pipeline, using practical examples and open-source code. While it focuses on discrete-event simulation, many of its principles and techniques apply broadly across different types of projects. It was developed as part of the project STARS: Sharing Tools and Artefacts for Reproducible Simulations. It is supported by the Medical Research Council [grant number MR/Z503915/1].
License: Creative Commons Attribution-ShareAlike 4.0 International license (CC BY-SA 4.0).
Course objectives#
This short course will guide you through the essentials of managing R environments.
🌎 Environments: What R environments are and why they matter.
🔄 R version: Switching between versions of R.
📦 Packages: Dependency management using
renv.⚙️ Other: Handling system libraries and project settings.
🛠️ Recreate & troubleshoot: Restoring environments and common fixes.
🧪 Activities: Have a go at R environment management!
📚 Further ideas: Advanced tools and workflows for managing R environments.
🌎 Environments
What is an R environment?
An R environment is the complete computational context required to run an R project. It includes:
The version of R itself.
All R packages (and their versions) used in your analysis.
System libraries required by some R packages.
Project-specific settings (e.g.,
.Rproj, .Rprofile).
Why are R environments important?
⏳ Reproducibility: By recording the exact R version and package versions, you can recreate your analysis at any time, on any machine, and get the same results.
🏝️ Isolation: Each project can have its own set of packages and R version, preventing conflicts between projects.
🤝 Collaboration: Ensures that everyone working on the project uses the same setup.
🔄 R version
For most users, the best way to manage R versions is to use rig GitHub page. It is a tool that allows you to easily install, list and switch between R versions on Windows, Mac and Linux.
How to use rig
Install rig
Follow the installation instructions for your operating system on the rig GitHub page. After installation, check that it works by running:
rig --version
View available R versions
List all R versions installed on your machine:
rig list
Example output:
* name   version  aliases
------------------------------------------
  3.6.0
  4.2.2
  4.3.1
  4.4.1
  4.5.0
Add a new R version
To install a specific R version:
rig add 4.1.2
Or simply add the latest version:
rig add
Set the active R version
Choose which R version should be active (for example, when you open RStudio):
rig default 4.1.2
This makes the selected version the default for new R sessions. (Note: If you later change versions manually or with other tools, you may need to reset this.)
Legacy methods
If you need to know about older or alternative approaches, here are some legacy methods:
Mac: RSwitch, Homebrew
Windows: CRAN installer
Linux: Manual installation, symbolic links
Note: These methods can be inconsistent and are generally more complex than rig.
📦 Packages
Tools for dependency management
The processing of tracking and controlling the packages your project uses, including their versions, is called dependency management.
In R, the most popular tool for managing dependencies is renv, which is covered in this course. renv replaced and improved upon the previous tool, Packrat.
Note: There is a new tool currently in development called rv which aims to provide a more modern, declarative workflow. It requires all dependencies to be specified before installation (rather than taking snapshots as you go along like renv).
Creating an renv environment
View steps
1. Install renv
If you haven’t already, install renv from CRAN:
install.packages("renv")
2. Create an R project
It’s best to use renv within an R project. R projects are commonly created and managed by RStudio.
In RStudio, select “File > New Project…” and choose “Existing Directory”.
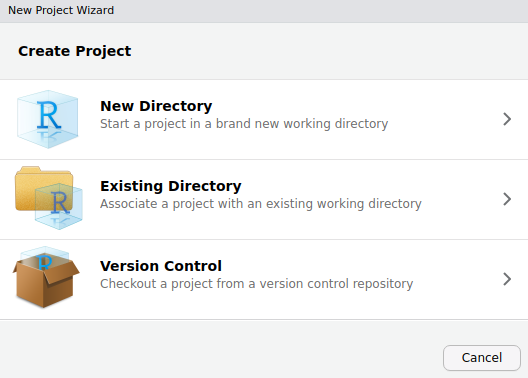
Navigate to your project directory, then select “Create Project”.
This will create :
.Rproj: project file (contains some settings for the project)..Rproject.user/: hidden folder with temporary project files (e.g. auto-saved source documents).
If you are not using RStudio, R projects can be difficult to set-up, as they have to be created manually. It is possible to use renv without an R project though, as discussed in this GitHub issue. This can be done using setwd() to set your repository as the current working directory, and then continuing with the steps below.
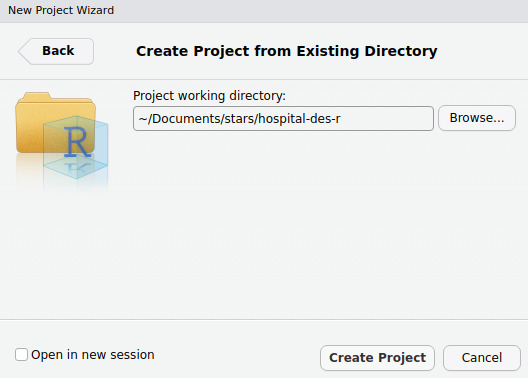
3. Initialise renv
In your R console, run:
renv::init()
This creates:
renv/: stores packages for the project.renv.lock: records packages and the exact versions used..Rprofile: ensuresrenvactivates when the project opens.
Example renv.lock containing only renv:
{
  "R": {
    "Version": "4.4.1",
    "Repositories": [
      {
        "Name": "CRAN",
        "URL": "https://packagemanager.posit.co/cran/latest"
      }
    ]
  },
  "Packages": {
    "renv": {
      "Package": "renv",
      "Version": "1.0.7",
      "Source": "Repository",
      "Repository": "CRAN",
      "Requirements": [
        "utils"
      ],
      "Hash": "397b7b2a265bc5a7a06852524dabae20"
    }
  }
}
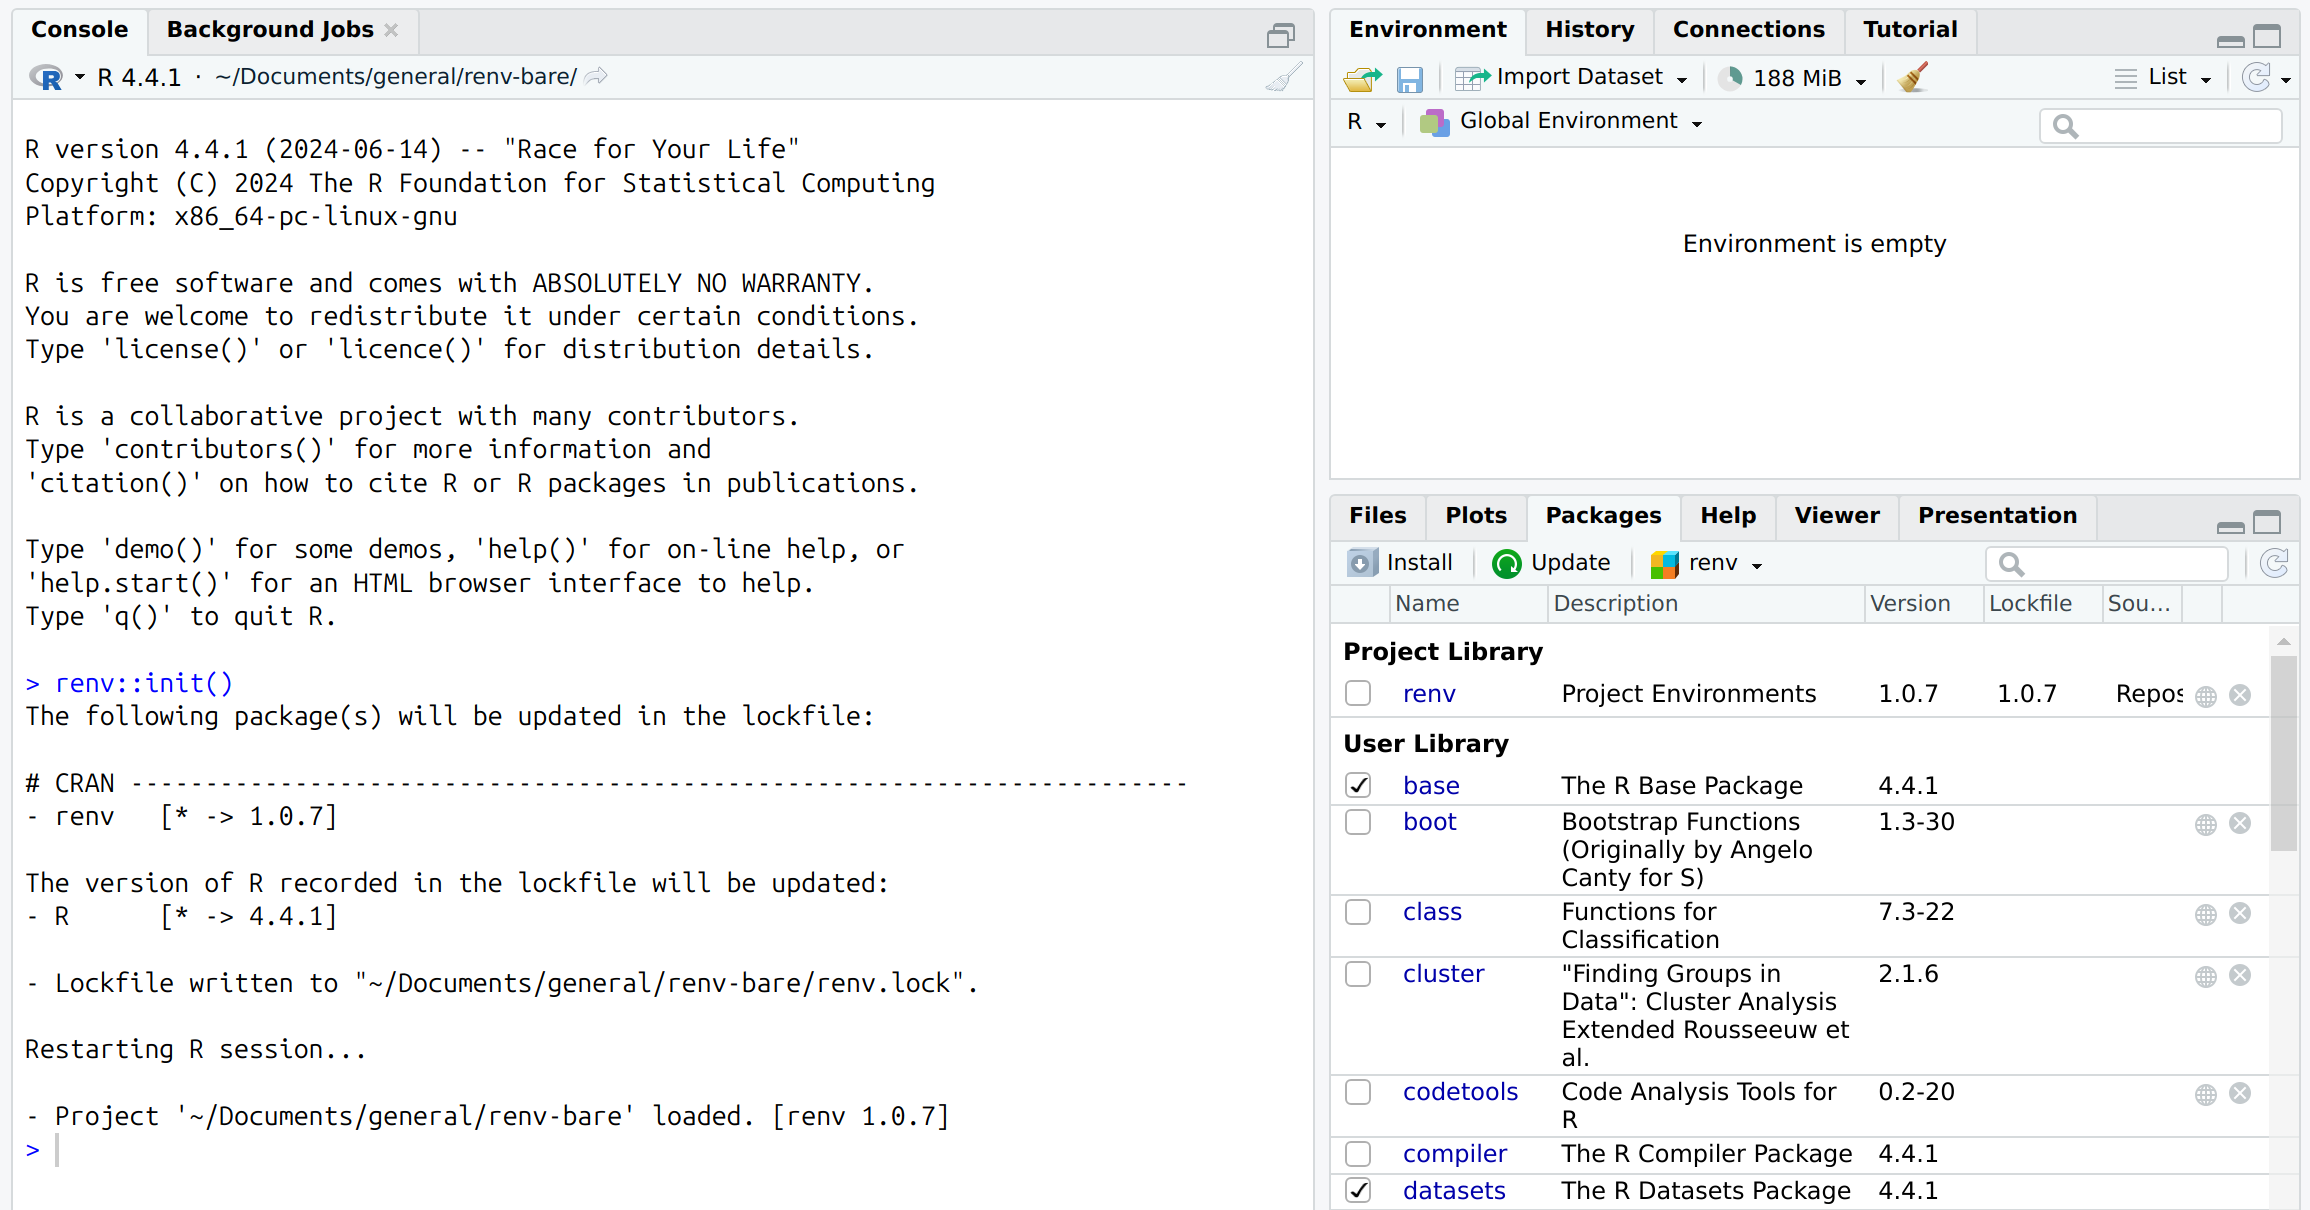
When you initialise renv, you project gets its own project library - a private folder (renv/library/) where packages are installed just for this project. This means package versions are isolated and recorded for each project, so updating a package in one project won’t break others. This makes collaboration and reproducibility much easier.
This is different from the user library, which is the default shared location where R installs packages used by all your R projects. See the “Packages” section on RStudio, which will show your project v.s. user library:
Some further information relevant when initialising renv:
Implicit or explicit mode
If a DESCRIPTION file is present, renv will prompt you to choose how dependencies are discovered:
Implicit mode:
renvwill scan you project files for any packages used in your code.Explicit mode:
renvwill use only the packages listed in yourDESCRIPTIONfile.
We recommend choosing implicit mode for most projects, as it ensures that all packages actually used in your code are detected and managed, even if you forget to list them in DESCRIPTION.
We’ll explain more about DESCRIPTION files and these modes in the section on adding packages to the environment.
Initialising a bare environment
By default, renv::init() will scan and install packages into your project library. If your directory is empty or contains no code using packages, only renv itself will be installed.
If you want to initialise renv without installing any packages, you can use:
renv::init(bare = TRUE)
This will create renv/ and .Rprofile but not renv.lock or a project library.
However, when you later run renv::snapshot(), renv will scan and install packages at that point. If you use implicit mode, it will detect and install all packages used in your code - even if you started with a bare environment.
We’ll explain more about snapshots and implicit mode in the section on adding packages to the environment.
Adding packages to the renv environment
View steps
It is possible to simply install packages directly using commands like:
renv::install("packagename")
install.packages("packagename")
However, we recommend using a DESCRIPTION file. This is a file listing only the main packages your project directly depends on - i.e. those you might have add using renv::install().
This differs from renv.lock which records all packages needed to recreate your environment, including every main package and all their dependencies, plus the exact versions used.
The benefit of using a DESCRIPTION file when adding packages is:
📝 Clear requirements. The
DESCRIPTIONfile gives a simple, readable summary of your project’s main packages. It’s much easier to read thanrenv.lock.📦 Consistency with package development. If your project is (or might become) an R package, the
DESCRIPTIONfile is the standard way to declare dependencies.🔄 Alternative for environment recreation. While
renv.lockis the primary tool for restoring anrenvenvironment, having aDESCRIPTIONfile is a valuable backup. If you encounter issues withrenv.lock, you can useDESCRIPTIONto reinstall the main dependencies.🎯 Explicit snapshots. If you want precise control over what’s included in
renv.lock, you can use an “explicit” snapshot. This means only the packages listed inDESCRIPTION(and their dependencies) are recorded.
1. Create a DESCRIPTION file
Create a file named DESCRIPTION and use the following template (which can be generated instead using usethis::use_description()):
Package: packagename
Title: What the Package Does (One Line, Title Case)
Version: 0.0.0.9000
Authors@R:
    person("First", "Last", , "first.last@example.com", role = c("aut", "cre"))
Description: What the package does (one paragraph).
License: `use_mit_license()`, `use_gpl3_license()` or friends to pick a
    license
Encoding: UTF-8
Roxygen: list(markdown = TRUE)
RoxygenNote: 7.0.0
2. List dependencies
Dependencies can be listed as:
Imports(required packages).Suggests` (optional/development packages).
For non-package projects, it’s simplest to list all dependencies under Imports, which will be identified by renv (whilst those under Suggests may not unless used in scripts).
Suggests is more relevant when constructing a package, as it distinguishes packages necessary only for optional features, vignettes or testing, from those required within the package itself.
Note: In the R Packages book, they recommend that - in DESCRIPTION - no versions are specified, or a minimum version is specified if you know that an older version of specific package/s would break the code. This is why it is important to also create an renv.lock file (as below), so you do have a record of the exact versions used.
Example DESCRIPTION with packages dplyr and future:
Package: example
Title: Example DESCRIPTION
Version: 0.0.0.9000
Authors@R:
    person("Amy", "Heather", , "a.heather2@exeter.ac.uk", role = c("aut", "cre"))
Description: This is an example DESCRIPTION, used for environment management.
License: MIT + file LICENSE
Encoding: UTF-8
Roxygen: list(markdown = TRUE)
RoxygenNote: 7.0.0
Imports:
    dplyr
    future
3. Install packages from DESCRIPTION
Install packages listed in DESCRIPTION (and their dependencies) with:
renv::install()
4. Update renv.lock
Take a snapshot of your environment and update renv.lock:
renv::snapshot()
There are three snapshot types:
Implicit (default): Records packages in
DESCRIPTIONand those used in your code.Explicit: Only records packages listed in
DESCRIPTION.All: Records all packages in your environment.
We recommend using the default (implicit) to ensure all used packages are captured, even if not listed in DESCRIPTION. However, you should remove unused scripts to avoid capturing unnecessary packages.
To check your current snapshot type:
renv::settings$snapshot.type()
To change it if needed:
renv::settings$snapshot.type("implicit")
renv::settings$snapshot.type("explicit")
renv::settings$snapshot.type("all")
Deleting an renv environment
View steps
To remove renv from a project, run:
renv::deactivate(clean = TRUE)
This will remove the renv auto-loaded, the renv/ directory, and the renv.lock file in one step, and restart the R session.
⚙️ Other
Besides the packages and R version used, your R environment will also include system libraries (external software required by some packages) and project-specific settings (e.g. .Rproj, .Rprofile).
Most researchers handle these components by:
Documenting required system libraries in the project’s README or set-up instructions.
Including project files (like
.Rprojand.Rprofile) in version control (e.g., Git).
🛠️ Recreate & troubleshoot
Recreating an existing R environment
View steps
This flowchart guides you through the main choices you’ll face when rebuilding an R environment:
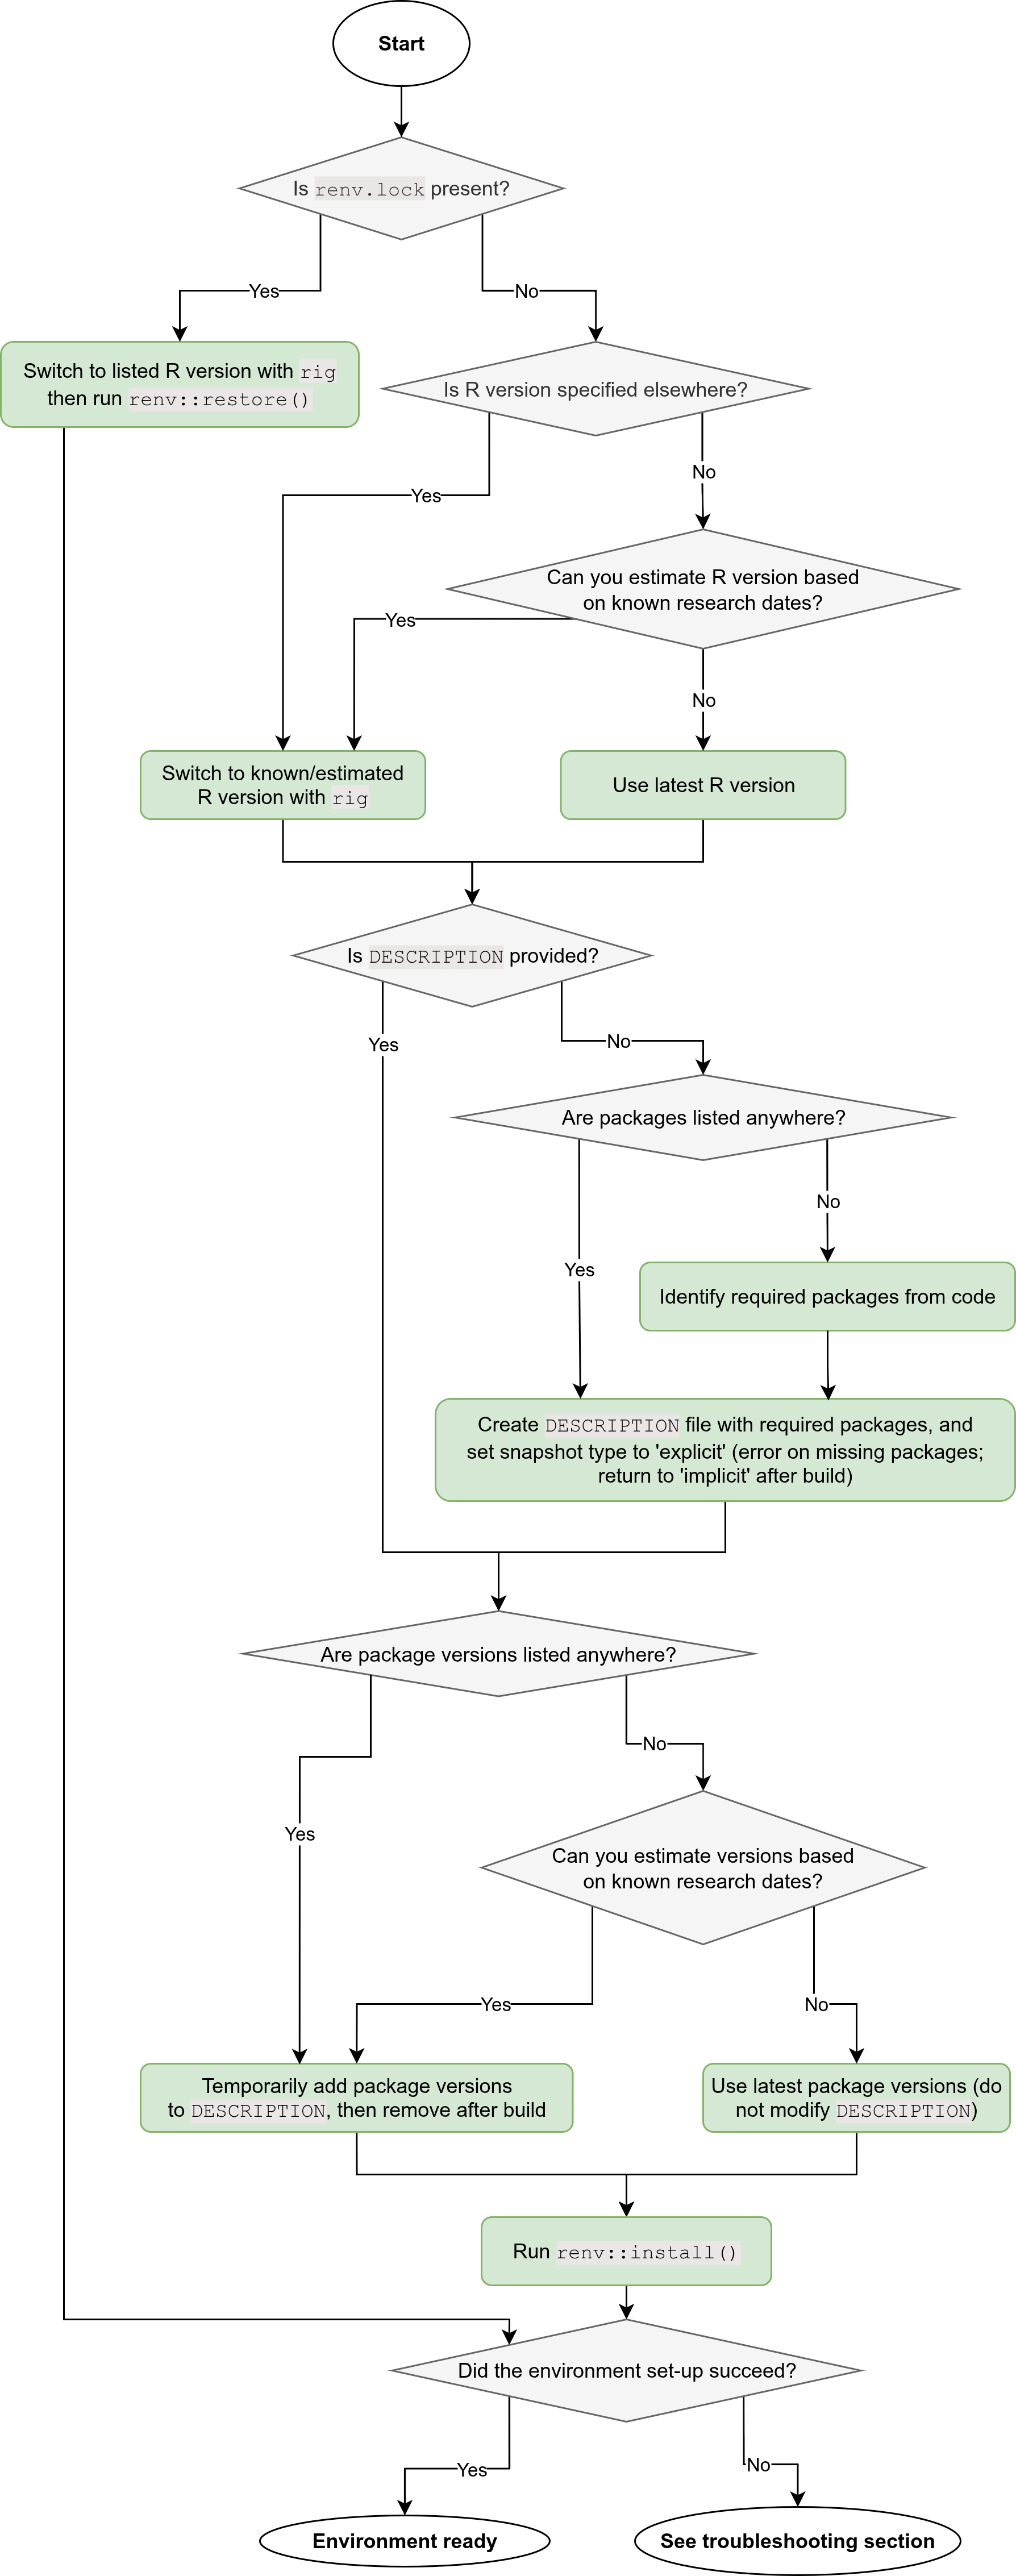
Some of the essential actions from this flowchart - alongside some additional considerations - are described below.
Switch R version.
Use
rigto easily change to the required R version (see ‘🔄 R version’).
Restore packages.
If you have an
renv.lockfile, run:renv::restore().If you are using a
DESCRIPTIONfile, run:renv::install().
Snapshot mode.
In ‘📦 Packages’, we recommend ‘implicit’ mode so that
renv.lockcaptures all packages used, even if you have forgot to add them toDESCRIPTION. However, when rebuilding an environment, ‘explicit’ mode can help ensure all required packages are listed inDESCRIPTION.
Additional environment components.
System libraries - covered in troubleshooting section.
Project-specific settings - these files (e.g.
.Rprofile,.Rproj) should be copied over if provided. They are not typically a source of errors but important for restoring full project environment, as they may contain custom project options.
Troubleshooting
View steps
Restoring an R environment can often run into issues, especially with older projects or system differences. Below are common problems and solutions.
Unavailable packages
When recreating environments with older R versions or package versions, you may encounter errors if those packages are no longer available for your chosen R version. CRAN often archives older packages, and support for very old R versions is limited.
Symptoms:
Errors stating that a package or a specific version cannot be found or installed.
Installation fails even though the package exists for newer R versions.
Solutions:
If exact reproducibility is not required, consider updating to a more recent R version and/or newer package versions.
For legacy work, search for archived source tarballs or consult the CRAN archive, but success isn’t guaranteed.
Backdating
If you set up your environment with the latest R and package versions (for example, when no specific versions are listed), you may find your code requires older package versions to work as expected.
Symptoms:
Code relies on functions or behaviors from earlier package versions.
Latest package versions introduce breaking changes.
Solutions:
Specify minimum or exact versions in your
DESCRIPTIONfile.Be aware that not all old versions are available for every R version; you may need to adjust your R version or accept a newer package.
To specify a minimum version in DESCRIPTION:
Imports:
    dplyr (>= 1.0.0)
To install a particular version using renv (which will be recorded in renv.lock after you call renv::snapshot()):
renv::install("dplyr@1.1.2")
Missing system dependencies
Some R packages require external system libraries (e.g., C libraries, database clients) not installed by default.
Symptoms:
Package installation fails with errors about missing libraries (e.g., “cannot find -lssl”, “libcurl not found”, missing
.sofiles).
Solutions:
Check the CRAN page for each package for any system requirements (listed beside
SystemRequirements). Theopensslandcurlpackages are a common source of these issues.Install the required system dependencies and document them in your
READMEfor others. For example:Ubuntu/Debian:
sudo apt-get install libssl-dev libcurl4-openssl-dev.Fedora/RHEL:
sudo dnf install openssl-devel libcurl-devel.MacOS:
brew install openssl curl.Windows: Follow package documentation or use precompiled binaries.
Legacy user libraries
If R has been installed for a long time, your user library (the default location for installed packages) may contain outdated or conflicting packages. This can interfere with renv, sometimes causing silent failures or unpredictable behaviour.
Symptoms:
renvcommands have no effect or fail with unclear messages.Packages are loaded from the user library instead of the project library.
Solutions:
Check
.libPaths()to confirm the project library is listed first whenrenvis active.Temporarily move or rename your user library directory and restart R to see if
renvworks correctly.If issues persist, consider reinstalling R or resetting your user library.
As a last resort, a clean operating system install can resolve deep or persistent conflicts.
General tips
Update renv: Bugs are fixed regularly - ensure you’re using the latest version.
Check permissions: Make sure you have write access to your project directory.
Consult logs: Use renv::diagnostics() to generate a report on your environment.
Search for known issues: Many problems are discussed (and solved) in the renv GitHub Issues tracker.
🧪 Activities
Let’s put theory into practice! These activities are designed to help you experience real-world workflows for managing R environments using renv and rig.
Activity 1: Create a reproducible R project from scratch
Goal: Set up a new R project with renv, add a package, capture the environment for reproducibility, and share it with others.
Suggested package and script: Use the ggplot2 package, and create a script named plot_example.R with the following code:
library(ggplot2)
ggplot(mtcars, aes(mpg, wt)) + geom_point()
View solution
Create a new R project.
In RStudio: Go to “File” > “New Project…” and choose “New Directory” or “Existing Directory” as needed.
Initialize
renv.In the R console, run:
install.packages("renv")
renv::init()
Install a package.
For example, to add
ggplot2, add this to aDESCRIPTIONfile and then runrenv::install()
Write and run a simple script.
Create a new R script (e.g.,
plot_example.R) with:library(ggplot2) ggplot(mtcars, aes(mpg, wt)) + geom_point()
Run the script to confirm everything works.
Snapshot the environment.
Save the current state of your environment:
renv::snapshot()
This updates the
renv.lockfile, recording all package versions.
Share your project.
Your project folder now contains everything needed for someone else to reproduce your analysis - just share the folder (via GitHub, ZIP, etc.).
Review the 📦 Packages page for more information on these steps.
Activity 2: Reproduce an existing R project
Goal: Clone a repository with a pre-configured renv environment, switch to the correct R version, restore dependencies, and run a basic R script.
Repository: amyheather/renv-reproduce-activity
View solution
Clone the provided repository.
git clone https://github.com/amyheather/renv-reproduce-activity.gitcd renv-reproduce-activity
Switch to the required R version.
Check the
renv.lockfile orREADMEfor the required R version.Use
rig(or your preferred tool) to switch R versions.
Restore the project environment.
Open the project in RStudio.
Run
renv::restore().
Run the example code.
Locate and run the provided R script (
analysis.R).
Troubleshoot (if needed).
If you encounter errors, refer to the troubleshooting section in 🛠️ Recreate & troubleshoot.
📚 Further ideas
If you are interested in exploring more advanced or alternative approaches to managing reproducible R environments - especially when dealing with complex external dependencies - consider the following tools and resources:
Docker for R
Using Docker allows you to encapsulate your entire R environment, including system libraries, R versions, and packages, inside a container. This approach can solve many issues related to external dependencies and ensures that your analysis runs identically across different systems.
dockerfiler: An R package for programmatically creating Dockerfiles, making it easier to build reproducible R environments with custom dependencies.rocker: A collection of Docker images for R, maintained by the R community, which you can use as a base for your own projects.
R-universe
R-universe is an online platform for building, hosting, and distributing R packages—including those not available on CRAN. It can help you:
Access packages from multiple sources, not just CRAN.
Set up custom repositories (collections of R packages) for your team or organisation.
Centralise package management (as repositories can include public, private and experimental).